blog_images_3__large-13.png
 The art of printmaking originated in the Far East and dates to at least the fifth century. Designs were carved into wood, then inked and pressed upon textiles or paper. In the centuries that followed, many different forms of printmaking emerged all over the globe.
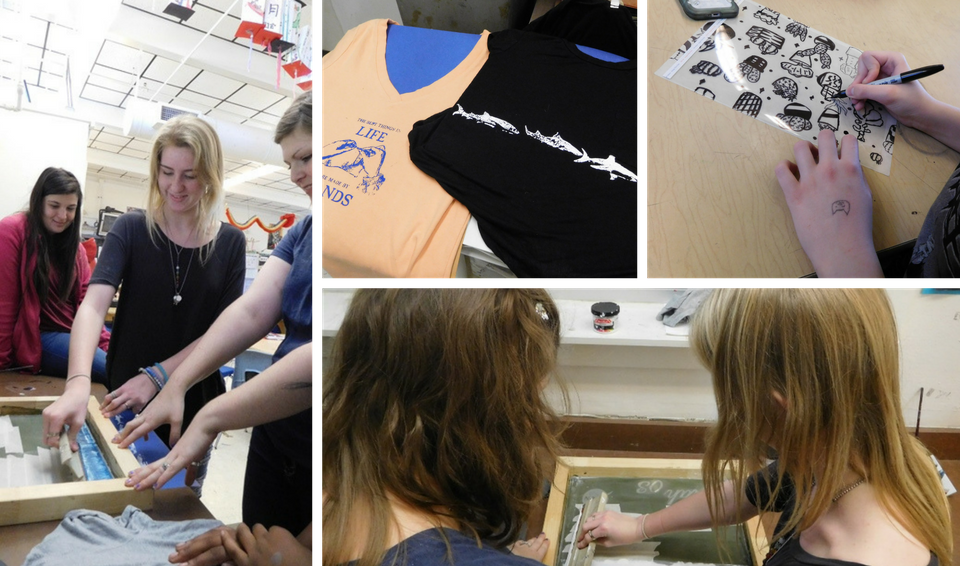
American pop artist Andy Warhol is largely credited with popularizing the silk-screen printmaking method in the 1960s with works featuring the iconic Marilyn Monroe and Campbell’s soup cans. The eighth-graders in Cobb Middle School’s advanced art class have been exploring printmaking, and their most recent venture was silk-screen.
“I wanted them to experience a whole unit of printing,” said Cobb art teacher Natalie Begley. “We do block printing with Styrofoam and some students do it with Linoleum block,” a variant on wood block that’s easier and safer to carve. “I wanted to give them another option with silk-screen.” Begley received an Arts Education grant from the Council on Culture & Arts to purchase the specialized tools and supplies needed for her students to explore the technique.
Though the process is relatively easy to execute, it’s cumbersome to describe and Begley anticipated that the instruction would be challenging. “We did a positive and negative space project before we even started printmaking. Then we did block printing,” a relief printing process.
The silk-screen process is known as a resist printing process. First, the artist creates a design on a transparent sheet using black ink. Then a thin and even layer of photosensitive emulsion is spread onto a framed, fine-mesh screen and left to dry completely. The transparent sheet is then flipped onto the wrong side and secured to the surface of the screen using transparent tape.
It is then exposed to light which causes the emulsion to harden and bind to the screen in the transparent areas, creating an impermeable barrier. In the areas where the light is blocked by the black ink on the transparent sheet, the emulsion remains water-soluble and can be easily washed out. This is the area through which the printing ink will pass to create the design. Once the screen has been washed out and has thoroughly dried, it is laid onto the printing material. Ink is spread on the inside of the screen and pressed through with a squeegee.
“It was hard for them to visualize it in their heads,” Begley said. “I showed them a YouTube video and I had all the tools out. We talked about every word, emulsion, squeegee, transparent and opaque, everything. Then they saw me do it and it was still hard to grasp.”
Lyric Carper confirmed, “when she was explaining it, it wasn’t really coming to me but I learned that it wasn’t as hard as I thought.” Though some students chose to draw their images by hand, others opted to use digital design tools. Lyric used Microsoft Word to manipulate text and images, creating a cohesive composition that incorporated her name and music notes. Though Begley doesn’t have Photoshop software, she teaches her students to use easily accessible alternatives. “You can do a lot with Word and they all have access to it through the school. You can play with text and you can always copy and paste an image and fiddle with it.”
Or visit the Tallahassee Democrat to read more